Hey everyone, it’s Mia from the Translucent Fiberglass Panel team here, and today I’m walking you through something I get asked about all the time: installing our translucent fiberglass panels on a curved surface. If you’ve ever tried hanging a flat sheet on a rounded wall or ceiling and ended up with weird gaps, bunching, or cracked fiberglass—you’re not alone. Curved installs are tricky, but they’re totally doable, especially when you work with the right materials and take your time. Let’s break this down step by step, no fancy jargon, just real tips I’ve picked up from working with builders and contractors who use our panels every day. Translucent Fiberglass Panel
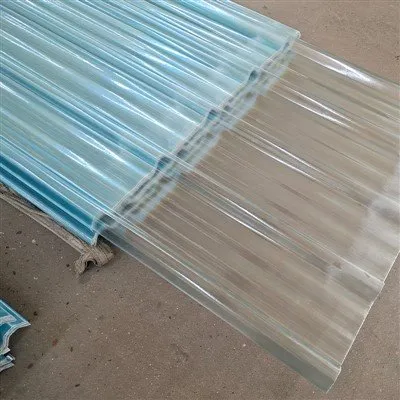
First, let’s start with the basics: why installing translucent fiberglass panels on a curve is different from a flat surface. Flat surfaces are straightforward—you measure, cut, screw, done. Curves? You’re dealing with tension, flex, and making sure the panel bends evenly instead of creasing or breaking. Fiberglass is durable, but it’s not invincible if you force it. The good news is our panels are engineered to flex, but only up to a point. That’s why the first thing I always tell people is to check the minimum bend radius for the specific panel you’re using. For most of our standard translucent fiberglass panels, that’s around 18 inches, but if you have a super tight curve (like a small archway or a rounded ceiling with a 12-inch radius), we have flexible variants made for that. Trust me, don’t skip this step—cracking a panel mid-install is the worst, and it’s usually because someone tried to bend a panel too far beyond its limit.
Next, prep is key. I see so many people skip measuring the curve properly and then end up ordering the wrong size panel. Here’s my trick for measuring curved surfaces: grab a flexible measuring tape (not a stiff ruler—stiff ones won’t follow the curve) and wrap it tight around the curve, making sure it’s lying flat against the surface without stretching. Jot that number down, then add 2 inches to each side for overlap—you’ll need that for securing the panel at the edges. Then, prep the surface you’re attaching the panel to. It doesn’t matter if it’s wood, metal, or drywall—just make sure it’s clean, dry, and free of any bumps or sharp edges that could scratch or tear the fiberglass. If the curve is on a ceiling, you might want to add temporary furring strips (thin, flat pieces of wood or metal) to follow the curve. These act as a guide, so you can screw the panel to them evenly instead of trying to fasten to a curved stud directly. Furring strips also help distribute tension, which prevents the panel from warping.
Now, the fun part (sort of) is cutting the panel to fit the curve. Wait—cutting, not bending first. I know, it sounds backwards, but hear me out. If you bend the panel before cutting, you might get uneven edges that don’t line up with the curve. Mark the panel flat on the ground (or a workbench—something sturdy) using the measurements you took, and cut it with a circular saw fitted with a fiberglass-cutting blade. If you don’t have a circular saw, a jigsaw with a fine-tooth blade works too—just go slow to avoid chipping the translucent layer. Once it’s cut, test fit it on the curve. Lay it over the curved surface and see if it sits evenly. If there are small gaps, you can trim a little more, but be careful not to overdo it. If it’s too tight, don’t force it—take it back and trim the edges a bit more.
Here’s the make-or-break step: pre-bending the panel. You can’t just lift the panel up to the curve and expect it to shape on its own—you’ll get bunching and wrinkles. Instead, pre-bend it on a curved form. If you don’t have a professional curved form, you can use two sawhorses set up the length of your curve, then place the panel across them, weighting the middle down with sandbags or heavy buckets for 24 to 48 hours. That lets the fiberglass “remember” the curve shape. For smaller curves, you can even do this in a few hours—just keep checking it to make sure it’s not bending too much. Pro tip: if it’s a warm day, you can leave the panel outside for a couple of hours before pre-bending—sunlight softens the fiberglass a little and makes it more flexible, without damaging the translucent finish.
Now, installation day. I recommend working with a partner on this—curved panels are big and awkward, and trying to lift one alone while holding it in place is a recipe for dropping it or messing up the alignment. Start at one end of the curve, not the middle. Line up the edge of the panel with the furring strip (or your curved surface’s starting point) and secure it with a temporary clip or a small nail. Don’t hammer it in all the way—you just want to hold it in place so you can adjust the curve. Once one end is secure, slowly work your way across the curve, pulling the panel slightly taut as you go. Not too tight—you don’t want to stretch it to the point where it cracks, just tight enough to eliminate wrinkles. Every 12 inches or so, add another temporary clip to hold it in place. Once the entire panel is lying evenly along the curve, double-check that it’s not twisted or pulled unevenly. Look at the edge next to the surface—if there’s a gap, adjust the clip a little to pull the panel closer.
Now, permanent fastening. This is where you want to use the right hardware, because the wrong screws or nails can crack the fiberglass. We recommend using self-tapping screws with neoprene washers. The neoprene washers create a seal so moisture doesn’t get under the screw, and the self-tapping screws bite into the furring strip or surface without needing to pre-drill (though if you’re working with metal, pre-drilling a small hole first will prevent the fiberglass from splitting). Drive the screws in every 16 to 18 inches, spacing them evenly along the curve. Start at the center and work your way to the ends—this keeps tension balanced as you go, which helps the panel lay flat. If you’re working on a ceiling, have your partner hold the panel up while you drive the screws in a little at a time, so it doesn’t slip down mid-install.
Wait, what about seams? If your curve is really long, you might need to use two panels joined together. That’s totally normal! When joining two panels on a curve, overlap them by 1.5 inches, and make sure both panels are pre-bent to the same curve before joining. Use a clear silicone adhesive that’s rated for fiberglass and curved surfaces, and apply a thin bead along the overlap, then press the panels together firmly. Wipe off any excess silicone immediately with a damp cloth—once it dries, it’s almost impossible to remove, and you don’t want ugly smudges on the translucent finish. Then, add a few screws along the seam to hold it secure while the silicone cures (wait 24 hours before removing those screws if you can).
I know a lot of people worry about the finish on curved panels—will it still look as good as flat ones? The short answer is yes, if you do it right. The key is taking your time with the pre-bending step and not forcing the panel to curve too much. I’ve seen builders mess this up by rushing, ending up with panels that have visible creases. But when done properly, the curve looks seamless, and the translucent light still shines through just like it’s supposed to—no weird shadows or gaps.
Also, a quick maintenance tip for curved panels on walls or ceilings: since they’re curved, dust and dirt can collect in the edges a little more than flat panels. Wipe them down with a soft, damp cloth every few months, and avoid using harsh chemicals—they can damage the translucent layer. If you ever need to repair a small crack or tear, we have a clear fiberglass repair kit that works seamlessly, so you don’t have to replace the whole panel.
Let me recap the most important takeaways, so you don’t forget them: 1) Check the minimum bend radius before starting, don’t force a panel that’s too stiff for your curve. 2) Measure twice, cut once—flexible tape is your friend. 3) Pre-bend the panel before installing, not after cutting. 4) Work with a partner, and space your fasteners evenly to avoid tension. 5) Use the right hardware (self-tapping screws, neoprene washers) to prevent cracking.
If you’re planning a curved install and want to make sure you’re ordering the right panel, or if you have questions about bend radii or repair kits, don’t hesitate to reach out to our team. We work with contractors, builders, and DIYers all the time to make sure their installs go smoothly, and we’re happy to share custom tips based on your specific project. Whether you’re doing a curved accent wall in a living room, a rounded ceiling in a commercial space, or an archway in a patio, translucent fiberglass panels look amazing when installed correctly.

Don’t let a curved surface scare you off—with these tips, you’ll have a seamless, translucent curve that looks pro-level, no fancy tools required.
Translucent Fiberglass Panel References
- Fiberglass Manufacturers Association. (2022). Installation Best Practices for Curved Fiberglass Reinforced Polymer Panels.
- Construction Trends Magazine. (2023). Choosing and Installing Translucent Building Panels for Curved Surfaces.
- Independent Building Materials Testing Lab. (2021). Flexural Properties of Common Translucent Fiberglass Panel Variants.
Handan Donghong Fiberglass & Color Steel Manufacturing Co., Ltd.
Handan Donghong Fiberglass & Color Steel Manufacturing Co., Ltd. is one of the most professional translucent fiberglass panel manufacturers and suppliers in China, featured by quality products and good price. Please rest assured to wholesale durable translucent fiberglass panel made in China here and get quotation from our factory. Customized orders are welcome.
Address: South side of the road, 2,000 meters west of the intersection of Nanhuan Road and Airport Road, Hanshan District, Handan City.
E-mail: leo@dhpcfrp.com
WebSite: https://www.dhfrpsheet.com/
